I bought my Dell Inspiron 6000 on July 14, 2005. It was an awesome experience because I never had a laptop before, and I was always too poor to afford a good computer (or anything good for that matter, haha). I was financially fortunate after college so I was able to buy this laptop. The truth about laptop computers is that they are notebook computers.
The name "laptop" denotes the portable computer is used on your lap. Haha. Using a portable computer on your lap is an ergonomic disaster for your wrists, shoulders, entire spine, and neck. Portable computers generate lots of heat, like all computers, so they can make your legs uncomfortably sweaty or they can actually give your lap minor burns. Laptops dissipate most of its heat from its bottom. Most laptops cool themselves off with only one small fan that draws in fresh air and expels hot air from openings at the bottom and sides of the laptop. If these openings are blocked off by something like your legs, the fan will operate poorly and the laptop will get even hotter than before. Because of all these reasons, a better-fitting name for laptop computers is notebook computer, or just notebook.
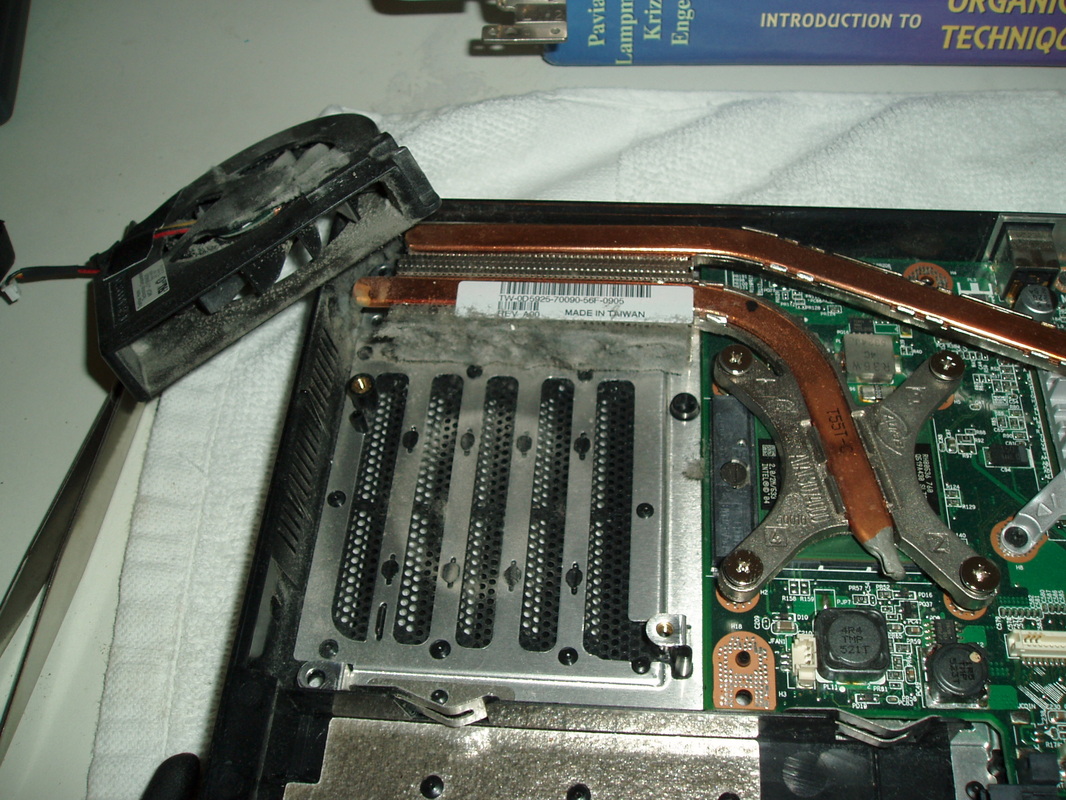
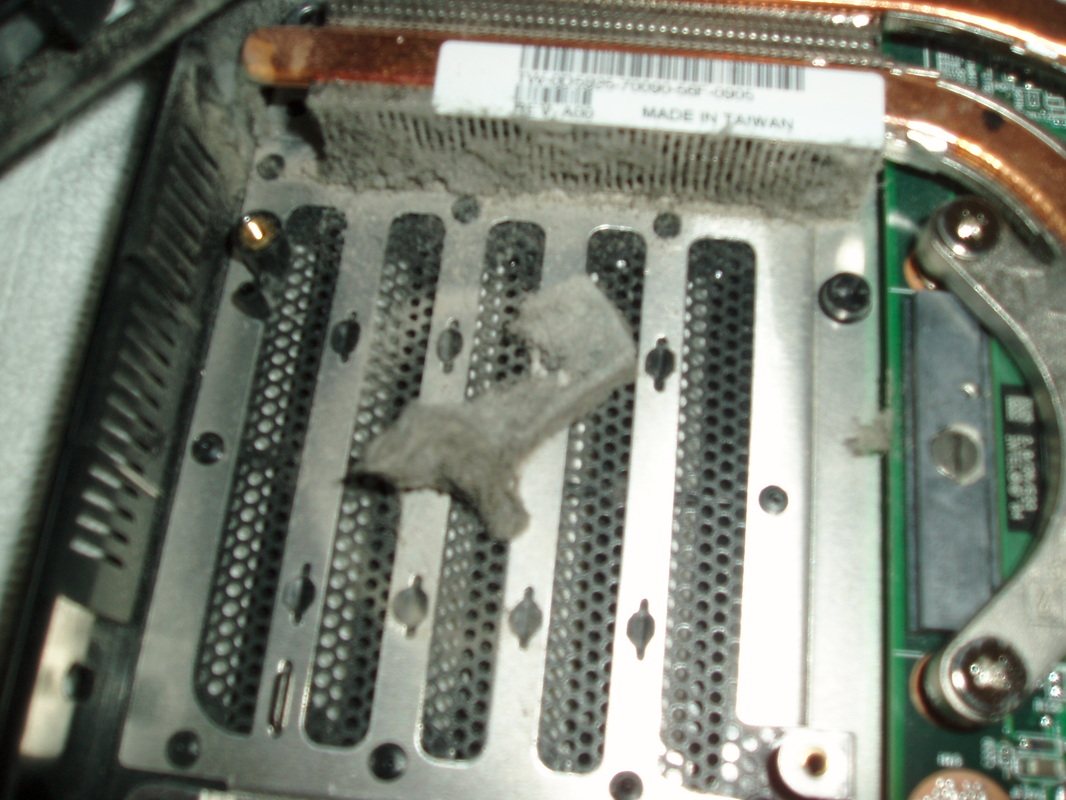
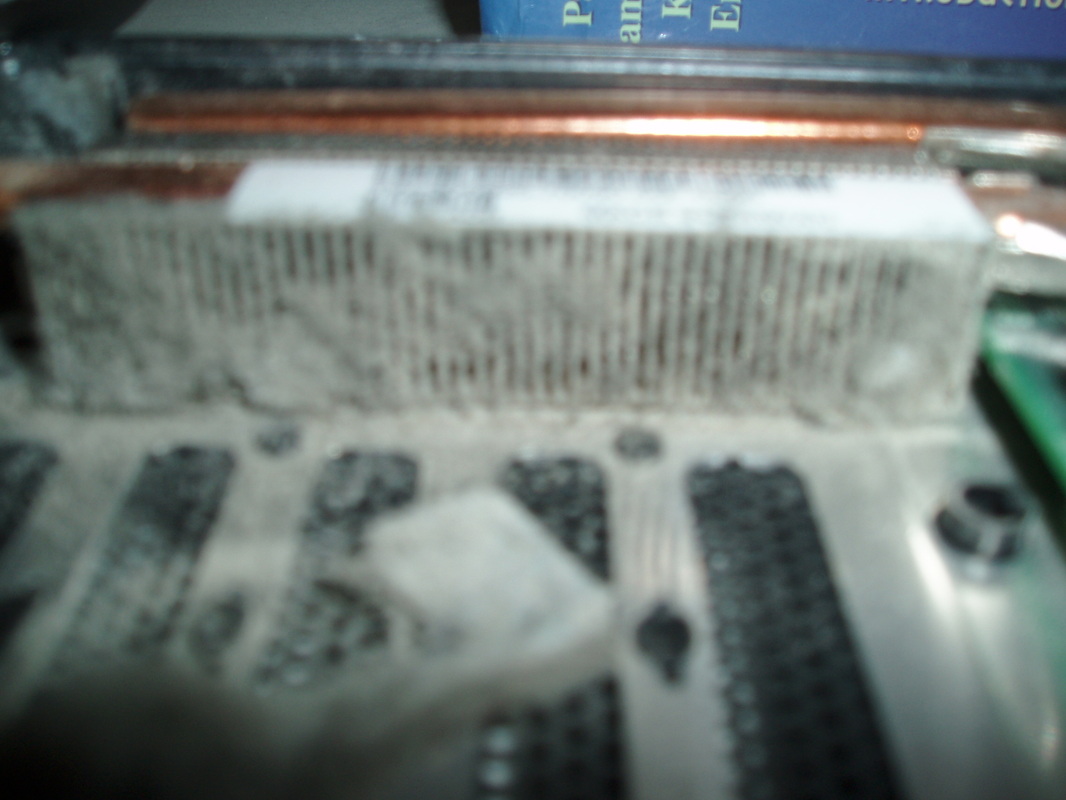
Heat became a major problem for my notebook. My notebook got hotter the more I used it. By July 10, 2007 (~ 2 years of usage), my notebook was getting way too hot. To solve this problem, I did some online research and discovered that the most probably culprit was dust. Let me explain. Notebooks have a snug construction, so the notebook's fan easily packs dust onto the notebook's innards and heatsink. Dust is a horribly conductor of heat. Thus, if you have dust covering your electronics and heatsink, your electronics and heatsink will have a hard time dissipating its heat and your electronics and heatsink will get hotter than before. If your computer gets too hot, it will decrease its performance to lower its heat. If your computer gets way too hot to properly operate, it will shut itself down or literally suffer a meltdown.
Another problem with dust is that dust interferes with the computer fan's airflow. Interrupted airflow will inefficiently cool down your computer, so your computer will overheat. This is true for all fans, even for the large fans that you use to cool yourself down during summer. If you do not believe me, try this experiment. Get your personal fan that is probably stuffed with dust. Turn it on medium setting and check out the fan's airflow. Then take apart the fan and clean out all the dust. Rebuild your fan, turn it on medium setting, and check out the fan's airflow. You'll notice that your dusty fan has less airflow than your clean fan.
In summary, dust is a poor conductor of heat, and dust interferes with airflow. When dust accumulates on your computer's fan and innards, the dust will decrease your computer's ability to keep itself cool, so your computer will get hotter than ever.
To take apart my notebook computer, first I familiarized myself with Dell's online manuals on how to safely open my notebook and clean out the dust. I also kept the manual open on my mom's computer for reference. Taking apart my notebook was not an easy task and was an expensively potential mishap. Here are pictures of my little adventure. I hope you learn from my experience, and I hope notebook designers create notebooks that end users can easily opened to readily clean dust buildups.
For heat and fan management, I use the free program "I8kfanGUI" version 3.1. Here's proof of how hot my notebook computer got due to dust buildup:
---> My notebook's heat data on July 10, 2007 BEFORE cleaning out the dust buildup:
Heat data when using Firefox Explorer 2.0, Correl WordPerfect, Winamp player (data when maxing out my computer by playing "Warcraft III: The Frozen Throne"). I use my notebook on a aluminum grill to facilitate cooling.
CPU: 50 degrees Celsius (90 degrees Celsius!!!)
GPU: 56 (80!!)
Memory: 45 (75)
Chipset: 49 (65)
HDD: 49 (55)
CPU Speed: 2000 MHz (2000 MHz)
Fan Speed: 2,900 to 4,000 (4,500 rpm)
This was so hot that it slightly discolored my LCD screen! Most of this heat was concentrated at the bottom of my notebook, especially around my dust-clogged heatsink. The second hottest spot extended from the top part of the middle of the keyboard and to the area around my power button, which is located just below my LCD. This area generated so much heat that when I folded my notebook, this area overheated the LCD above it. The result is my LCD screen has a small, circular area that is slightly cloudy. Thankfully, this overheated area on the LCD can only be somewhat seen when the LCD is turned off. It seems like only the LCD's protective surface got overheated, while the crystals and electronics underneath are perfectly fine. Things could have a been a lot worse. Whew.
---> My notebook's heat data on July 10, 2007 AFTER cleaning out the dust buildup:
Heat data when using Firefox Explorer 2.0, Correl WordPerfect, Winamp player (data when maxing out my computer by playing "Warcraft III: The Frozen Throne"). I use my notebook on a aluminum grill to facilitate cooling.
CPU: 30 degrees Celsius (51)
GPU: 39 (52)
Memory: 33 (44)
Chipset: 36 (50)
HDD: 40 (45)
CPU Speed: 2000 MHz (2000 MHz)
Fan Speed: 2,500 to 3,100 rpm (3,900 rpm to 4,500 rpm)
Compare the before and after data. See how dust EASILY prevents your computer from properly dissipating heat. Within two years, my notebook accumulated so much dust that it was reaching very high temperatues. Sometime in the future, I will most likely have to clean out my notebook again. See my pictures below for more information about how I cleaned the dust out of my notebook.
The name "laptop" denotes the portable computer is used on your lap. Haha. Using a portable computer on your lap is an ergonomic disaster for your wrists, shoulders, entire spine, and neck. Portable computers generate lots of heat, like all computers, so they can make your legs uncomfortably sweaty or they can actually give your lap minor burns. Laptops dissipate most of its heat from its bottom. Most laptops cool themselves off with only one small fan that draws in fresh air and expels hot air from openings at the bottom and sides of the laptop. If these openings are blocked off by something like your legs, the fan will operate poorly and the laptop will get even hotter than before. Because of all these reasons, a better-fitting name for laptop computers is notebook computer, or just notebook.
Heat became a major problem for my notebook. My notebook got hotter the more I used it. By July 10, 2007 (~ 2 years of usage), my notebook was getting way too hot. To solve this problem, I did some online research and discovered that the most probably culprit was dust. Let me explain. Notebooks have a snug construction, so the notebook's fan easily packs dust onto the notebook's innards and heatsink. Dust is a horribly conductor of heat. Thus, if you have dust covering your electronics and heatsink, your electronics and heatsink will have a hard time dissipating its heat and your electronics and heatsink will get hotter than before. If your computer gets too hot, it will decrease its performance to lower its heat. If your computer gets way too hot to properly operate, it will shut itself down or literally suffer a meltdown.
Another problem with dust is that dust interferes with the computer fan's airflow. Interrupted airflow will inefficiently cool down your computer, so your computer will overheat. This is true for all fans, even for the large fans that you use to cool yourself down during summer. If you do not believe me, try this experiment. Get your personal fan that is probably stuffed with dust. Turn it on medium setting and check out the fan's airflow. Then take apart the fan and clean out all the dust. Rebuild your fan, turn it on medium setting, and check out the fan's airflow. You'll notice that your dusty fan has less airflow than your clean fan.
In summary, dust is a poor conductor of heat, and dust interferes with airflow. When dust accumulates on your computer's fan and innards, the dust will decrease your computer's ability to keep itself cool, so your computer will get hotter than ever.
To take apart my notebook computer, first I familiarized myself with Dell's online manuals on how to safely open my notebook and clean out the dust. I also kept the manual open on my mom's computer for reference. Taking apart my notebook was not an easy task and was an expensively potential mishap. Here are pictures of my little adventure. I hope you learn from my experience, and I hope notebook designers create notebooks that end users can easily opened to readily clean dust buildups.
For heat and fan management, I use the free program "I8kfanGUI" version 3.1. Here's proof of how hot my notebook computer got due to dust buildup:
---> My notebook's heat data on July 10, 2007 BEFORE cleaning out the dust buildup:
Heat data when using Firefox Explorer 2.0, Correl WordPerfect, Winamp player (data when maxing out my computer by playing "Warcraft III: The Frozen Throne"). I use my notebook on a aluminum grill to facilitate cooling.
CPU: 50 degrees Celsius (90 degrees Celsius!!!)
GPU: 56 (80!!)
Memory: 45 (75)
Chipset: 49 (65)
HDD: 49 (55)
CPU Speed: 2000 MHz (2000 MHz)
Fan Speed: 2,900 to 4,000 (4,500 rpm)
This was so hot that it slightly discolored my LCD screen! Most of this heat was concentrated at the bottom of my notebook, especially around my dust-clogged heatsink. The second hottest spot extended from the top part of the middle of the keyboard and to the area around my power button, which is located just below my LCD. This area generated so much heat that when I folded my notebook, this area overheated the LCD above it. The result is my LCD screen has a small, circular area that is slightly cloudy. Thankfully, this overheated area on the LCD can only be somewhat seen when the LCD is turned off. It seems like only the LCD's protective surface got overheated, while the crystals and electronics underneath are perfectly fine. Things could have a been a lot worse. Whew.
---> My notebook's heat data on July 10, 2007 AFTER cleaning out the dust buildup:
Heat data when using Firefox Explorer 2.0, Correl WordPerfect, Winamp player (data when maxing out my computer by playing "Warcraft III: The Frozen Throne"). I use my notebook on a aluminum grill to facilitate cooling.
CPU: 30 degrees Celsius (51)
GPU: 39 (52)
Memory: 33 (44)
Chipset: 36 (50)
HDD: 40 (45)
CPU Speed: 2000 MHz (2000 MHz)
Fan Speed: 2,500 to 3,100 rpm (3,900 rpm to 4,500 rpm)
Compare the before and after data. See how dust EASILY prevents your computer from properly dissipating heat. Within two years, my notebook accumulated so much dust that it was reaching very high temperatues. Sometime in the future, I will most likely have to clean out my notebook again. See my pictures below for more information about how I cleaned the dust out of my notebook.

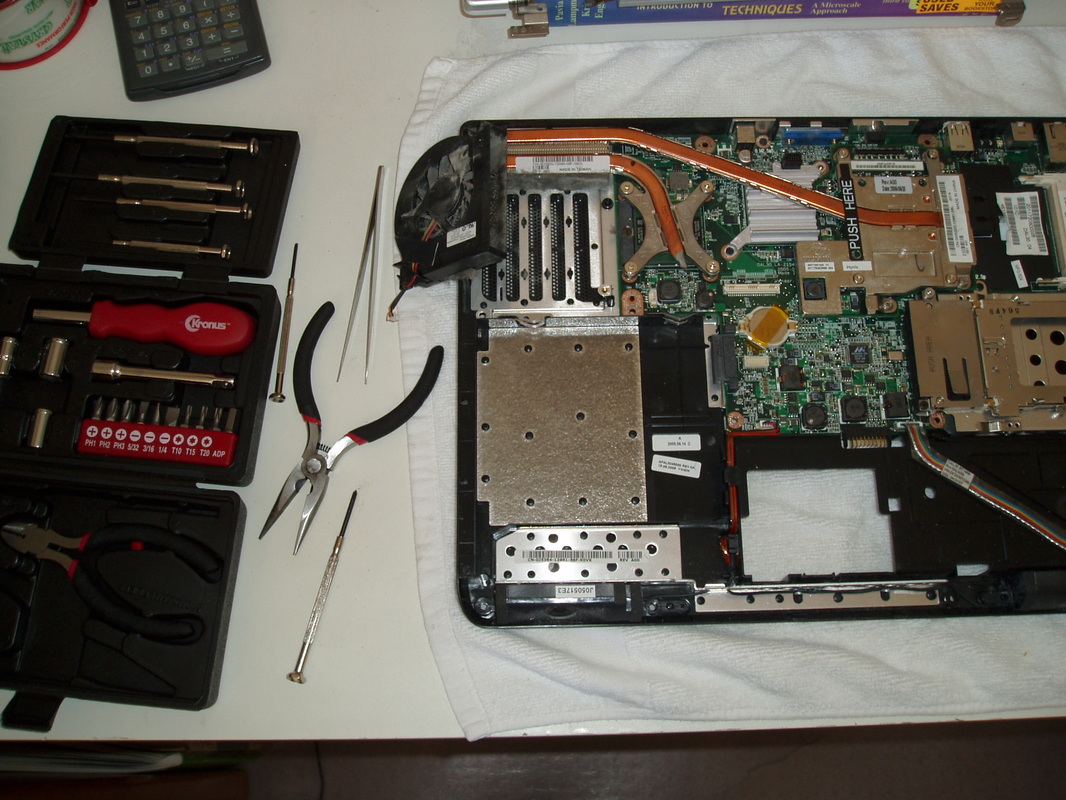
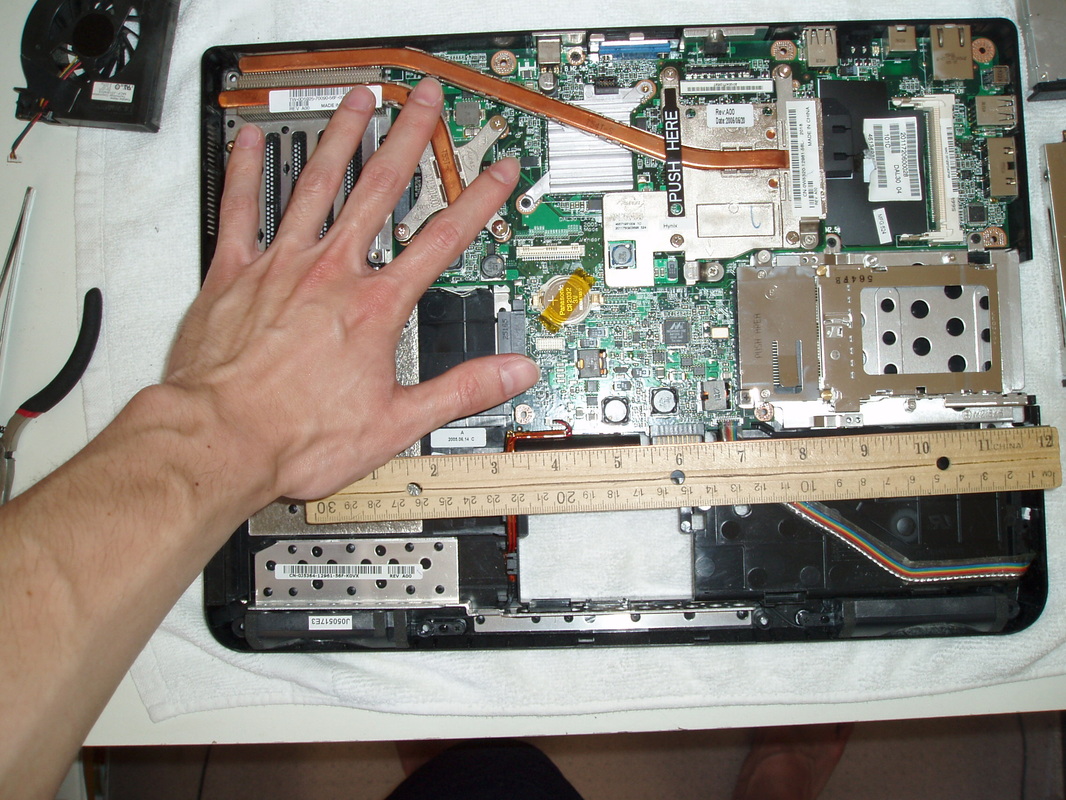
Here is my notebook completely taken apart. Notice how I placed the notebook on a piece of cloth so the table does not scratch the laptop. This cloth also softens the table's surface just in case I accidently drop a piece.
That stuff in the middle of the picture is the notebook's main case with the motherboard, the CPU, and the GPU.
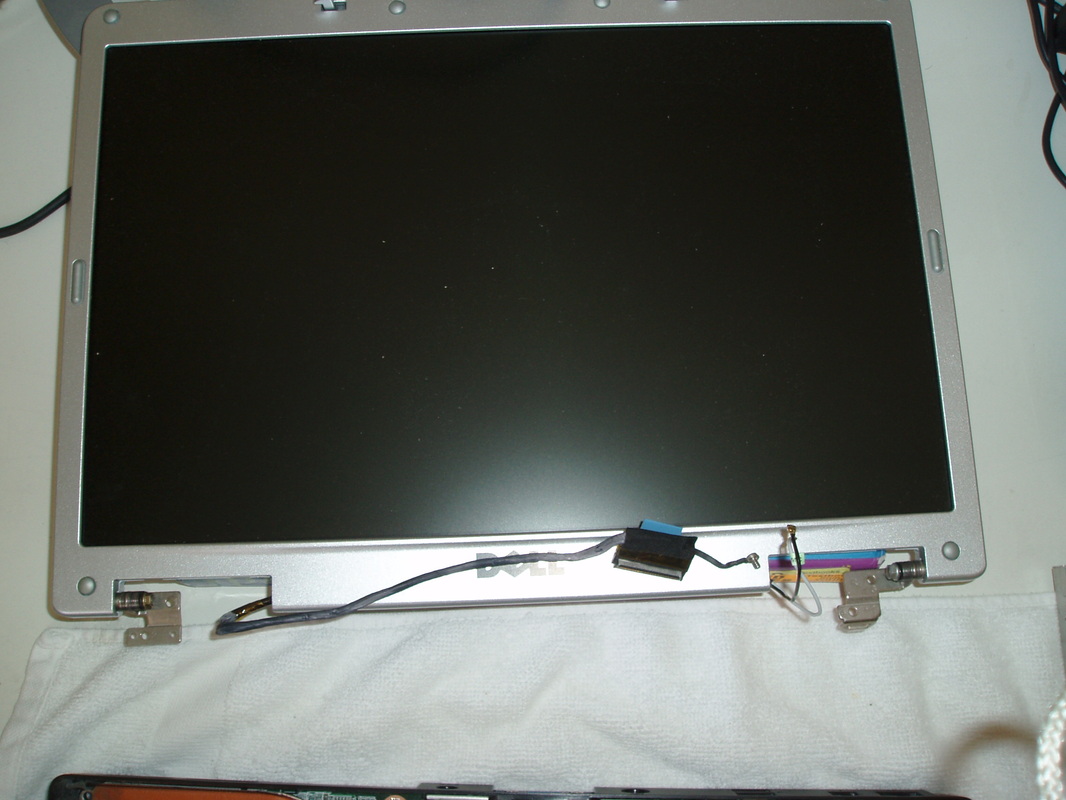
Above the main case is the LCD screen. To the right of the LCD screen is notebook's palm rest (the square, silver-colored thing) and the keyboard (the square black thing below the palm rest and on top of my aluminum grill).
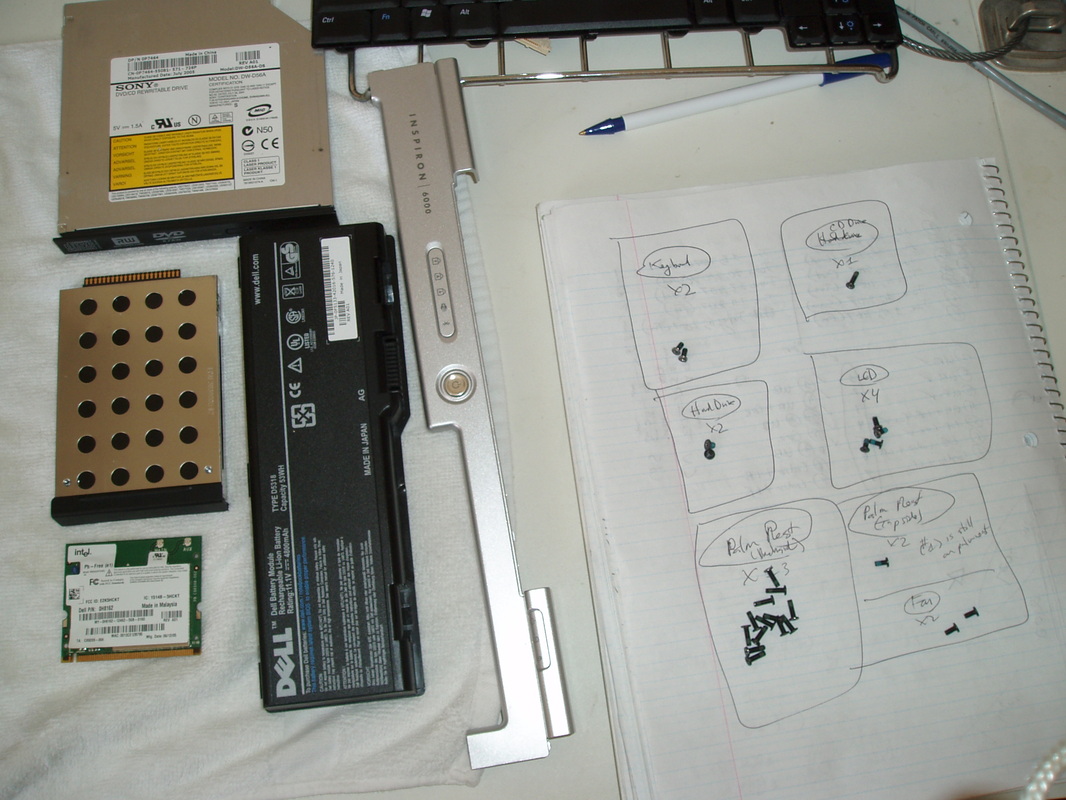
To the right of my main case is my DVD/CD drive, hard drive, wireless internet card, battery, and a trim piece (the long, silver-colored thing). To the most right is my paper notebook. I organized my notebook's screws here. There were lots of screws.
To the left of the main case is my took kit: a phillips screwdriver, a screwdriver, a long-nose plier, a tweezer, and leather gloves (not pictured). I wore leather gloves becuase I was tearing up my hands' skin from screwing out and screwing in lots of screws. The screws were installed very tightly.
I used the tweezers to pick up loose screws that were located in tight places.
To avoid stripping the head of the notebook's screws, I worked very carefully and calmly. I used my hands to unscrew all the screws that were not tightly installed.
For screws that were too tightly installed, I used a leather glove on my left hand, the plier, and one of the screwdrivers. I used my left hand to carefully, but firmly push down the screwdriver into the screw. I used my right hand to hold a plier. I used the plier to firmly grip the screwdriver. In one, careful, firm movement, I twisted counterclockwise to loosen up the screw. Once the screw was loose, I unscrewed the screw with just the screwdriver.
Sometimes, the screw was be so tight, the above technique did NOT work. For such screws, I used the long nose plier. I used the plier to firmly bite down onto the screw-head's sides. I used my right hand to wield the plier and my left hand to push the plier down. I did not want to accidently bite my left hand with the pliers, so I wore leather gloves on my left hand and my left hand pushed down on the plier's hinge.
I had to be very firm when biting down the screw-head's side with the plier in my right hand. I also had to be very firm when pushing down the plier with my left hand. In one, carefull, very smooth motion, I loosened the firmly entrenched screw. This technique will strip the screw-head's side a little, but this is much better than stripping the top of the screw head.
I used the above two techniques to screw back screws that were difficult to screw back into the notebook. Some screws were impossible to screw back even with the above two techniques. To solve this, I applied a very small amount of grease (or oil or industrial jelly) to the entire body of the screw, so the screw slipped into position pretty easily.
If you use grease, ensure the grease can withstand high temperates, and the grease will NOT dry out and become glue-like (because then you will not be able to remove the greased screw at a later date). When you apply the grease to the screw, use this technique: release some grease onto a quarter (yes, a 25-cents quarter) and then use a toothpick to move a minute amount of grease from the quarter onto the screw's body. Finally, screw back your computer parts. Keep the grease away from the screw's head (you don't want this part to be slippery) and away from your computer's circuits. Certain types of grease can be used directly on circuits, but even then, keep grease away from your circuits. You don't want greasy computer components because the grease can leak out and create a mess or the grease can make your computer components slippery to handle.
That stuff in the middle of the picture is the notebook's main case with the motherboard, the CPU, and the GPU.
Above the main case is the LCD screen. To the right of the LCD screen is notebook's palm rest (the square, silver-colored thing) and the keyboard (the square black thing below the palm rest and on top of my aluminum grill).
To the right of my main case is my DVD/CD drive, hard drive, wireless internet card, battery, and a trim piece (the long, silver-colored thing). To the most right is my paper notebook. I organized my notebook's screws here. There were lots of screws.
To the left of the main case is my took kit: a phillips screwdriver, a screwdriver, a long-nose plier, a tweezer, and leather gloves (not pictured). I wore leather gloves becuase I was tearing up my hands' skin from screwing out and screwing in lots of screws. The screws were installed very tightly.
I used the tweezers to pick up loose screws that were located in tight places.
To avoid stripping the head of the notebook's screws, I worked very carefully and calmly. I used my hands to unscrew all the screws that were not tightly installed.
For screws that were too tightly installed, I used a leather glove on my left hand, the plier, and one of the screwdrivers. I used my left hand to carefully, but firmly push down the screwdriver into the screw. I used my right hand to hold a plier. I used the plier to firmly grip the screwdriver. In one, careful, firm movement, I twisted counterclockwise to loosen up the screw. Once the screw was loose, I unscrewed the screw with just the screwdriver.
Sometimes, the screw was be so tight, the above technique did NOT work. For such screws, I used the long nose plier. I used the plier to firmly bite down onto the screw-head's sides. I used my right hand to wield the plier and my left hand to push the plier down. I did not want to accidently bite my left hand with the pliers, so I wore leather gloves on my left hand and my left hand pushed down on the plier's hinge.
I had to be very firm when biting down the screw-head's side with the plier in my right hand. I also had to be very firm when pushing down the plier with my left hand. In one, carefull, very smooth motion, I loosened the firmly entrenched screw. This technique will strip the screw-head's side a little, but this is much better than stripping the top of the screw head.
I used the above two techniques to screw back screws that were difficult to screw back into the notebook. Some screws were impossible to screw back even with the above two techniques. To solve this, I applied a very small amount of grease (or oil or industrial jelly) to the entire body of the screw, so the screw slipped into position pretty easily.
If you use grease, ensure the grease can withstand high temperates, and the grease will NOT dry out and become glue-like (because then you will not be able to remove the greased screw at a later date). When you apply the grease to the screw, use this technique: release some grease onto a quarter (yes, a 25-cents quarter) and then use a toothpick to move a minute amount of grease from the quarter onto the screw's body. Finally, screw back your computer parts. Keep the grease away from the screw's head (you don't want this part to be slippery) and away from your computer's circuits. Certain types of grease can be used directly on circuits, but even then, keep grease away from your circuits. You don't want greasy computer components because the grease can leak out and create a mess or the grease can make your computer components slippery to handle.

 RSS Feed
